You're standing at the top of a run, the world is blanketed in perfect white, the light is magical, and your camera is... in the lodge. Or worse, you have it with you but every shot looks flat, cluttered, or just like everyone else's. Ski photography is tough. The cold kills batteries, the glare washes out detail, and finding a unique vantage point feels impossible. But when you get it right—when you capture that perfect carve against a backdrop of jagged peaks or the soft glow of sunrise on fresh powder—it's worth every frozen finger.
This guide isn't about randomly pointing your camera on the slopes. It's a systematic plan from a photographer who's spent a decade figuring this out the hard way. We'll move beyond the obvious lodge deck shot and dive into the specific spots, times, and techniques that separate postcard photos from portfolio-worthy art.
What's Inside This Guide
Why Ski Photography is a Different Beast
Landscape photography is hard. Adventure sports photography is hard. Combine them in sub-zero temperatures with expensive, fragile equipment, and you've got a serious challenge. The mistake most people make is treating a ski trip like any other photo outing. It's not.
The light is extreme and reflected from every snow surface. Dynamic range goes crazy—your subject's face is in shadow under a helmet, but the snow behind them is blindingly bright. Condensation is a silent killer when moving between cold outdoors and warm lodges. And access? You can't just hike anywhere; you're bound by lift tickets and trail maps.
Understanding these constraints is the first step to beating them. It forces you to be more intentional, to scout with a skier's map, and to prioritize moments over marathon shooting sessions.
Top Photo Spots: A Resort-by-Resort Breakdown
Let's get specific. Generic advice is useless. Here are detailed spots at three iconic but distinct ski areas, with the kind of info you'd get from a local photographer.
Whistler Blackcomb, British Columbia
The scale here is immense. The classic shot is from the Peak 2 Peak Gondola looking back at Whistler or Blackcomb mountain. But everyone has that. For something unique, take the Harmony Express chairlift. Get off and ski about 200 meters down Harmony Piste. Look back up. You'll have a stunning, less-photographed view of the lift line with Black Tusk mountain in the far distance—perfect for layering. Best light is mid-morning. No extra cost beyond your lift ticket.
For sunset, the Rendezvous Lodge patio on Blackcomb faces west. You get the sun dipping behind the Coast Mountains, painting the sky. It's crowded for apres-ski, so go 30 minutes before sunset to claim a spot. Address: 4545 Blackcomb Way, Whistler. Access via the Wizard Express and Solar Coaster lifts.
Aspen Snowmass, Colorado
Aspen is about iconic Americana. The most photographed tree in skiing might be the lone evergreen on the ridge of Ruthie's Run on Aspen Mountain. Take the Ruthie's lift, ski down the run a bit, and hike back up the ridge slightly (with care). Frame the tree with the town of Aspen in the valley below. Shoot at sunrise—the first lift on Ajax opens at 9 am, but for true sunrise shots, you need special photographer access permits arranged in advance through the resort.
A less-known gem is the Elk Camp area on Snowmass. Take the Elk Camp Gondola up. Instead of skiing down immediately, traverse skier's right along the ridge. You'll find rolling, pristine snowfields dotted with trees—a minimalist's dream. The light is soft and even here all afternoon. Address for base: 120 Carriage Way, Snowmass Village.
Niseko United, Japan
It's all about the snow and the volcano. The single best spot is from the top of the King Number 4 lift at Niseko Annupuri. On a clear day, you have a direct, unobstructed view of the perfectly conical Mount Yotei. It looks like Fuji's cousin. The catch? It's only clear about one day in three. Check the forecast relentlessly and be ready to drop everything when the clouds part. Best time is early morning right after a storm clears. The lift opens at 8:30 AM. A one-day all-mountain pass is around ¥8,000.
For night photography (a Niseko specialty due to its lit pistes and frequent snowfall), station yourself near the Ace Family pair lift at the base of Hirafu. The falling snow is illuminated by the lift lights, creating incredible streaks. Use a tripod (yes, in the snow) and a shutter speed of 1/15th to 1/4th of a second to capture the motion.
Pro Tip Most Miss: The light is almost always better in the hour after a storm clears than during the storm itself. The snow is fresh, the clouds are breaking, and the contrast returns. Plan your shooting schedule around weather windows, not just the clock.
| Resort & Spot | Best Time to Shoot | Key Subject / Vibe | Access / Logistics Note |
|---|---|---|---|
| Whistler: Harmony Chair Lookback | Mid-Morning (9:30 AM - 11 AM) | Layered landscapes with distant peaks | Requires intermediate skiing ability to access the viewpoint safely. |
| Aspen: Ruthie's Run Tree | Sunrise (with permit) or Late Morning | Iconic lone tree with town backdrop | Sunrise requires pre-arranged permit. Be mindful of skiers on the run. |
| Niseko: Top of King #4 Lift | First clear morning after snowfall | Perfect volcano (Mt. Yotei) view | Weather-dependent. Have a flexible schedule. Very exposed and windy at the top. |
| Snowmass: Elk Camp Ridge Traverse | Afternoon (1 PM - 4 PM) | Minimalist snowfield and tree patterns | Easy traverse from the gondola. Great for all skill levels looking for calm scenes. |
The Gear That Won't Fail You in the Cold
Your fancy mirrorless camera might be a brick at -10°C if you don't prepare. I've learned this through dead batteries at perfect moments.
Camera Body: Weather-sealing is non-negotiable. A used, older professional DSLR like a Nikon D750 often handles condensation shock better than a new, unsealed mirrorless. If you shoot mirrorless, keep a spare battery in an inner pocket, not your backpack. Cold drains them insanely fast. I put hand warmers in my camera bag pouch, but never directly on the camera—it causes condensation.
Lenses: A mid-range zoom (24-70mm f/2.8 equivalent) is your workhorse. It's versatile for landscapes and closer action. A fast prime (like a 35mm f/1.8) is great for low-light lodge shots or portraits with creamy bokeh. Leave the giant telephoto at home unless you're specifically shooting pro racers.
The Critical Extras:
- Lens Hood: Not just for flare. It protects the front element from snow and ski pole tips.
- Microfiber Cloths (Many): Snow gets on the lens. You'll use one constantly. Store them in a zip-lock to keep dry.
- Small Silica Gel Packs: Toss these in your camera bag overnight to absorb any moisture.
- Backpack: Use a dedicated ski touring or hiking backpack with a padded camera insert. It needs to sit snugly while you ski.
Composition and Light: The Local's Secrets
Post-processing can't fix boring composition. On snow, you have to work harder to find leading lines and points of interest.
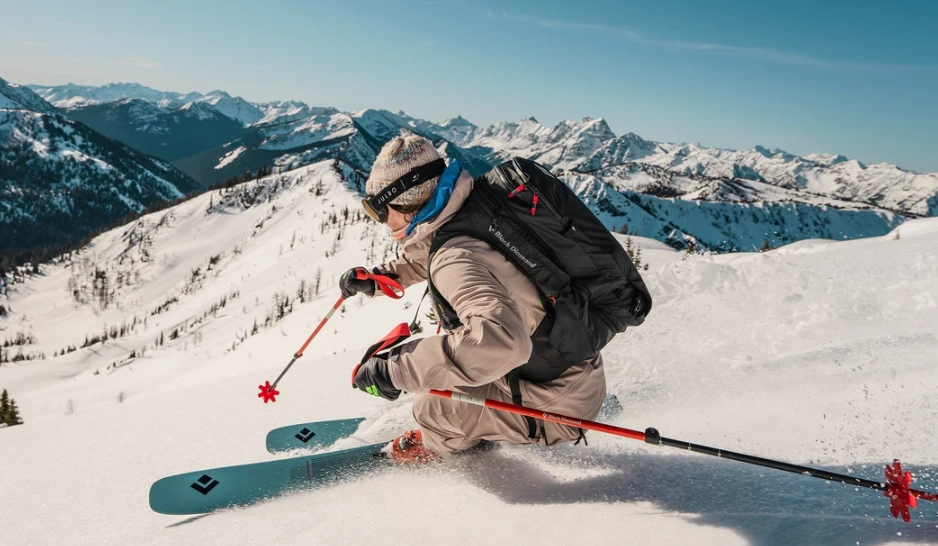
Use the Terrain: Ski tracks are natural leading lines. A smooth S-curve carved into untouched powder draws the eye beautifully. Look for shadows—the long, blue shadows of late afternoon create dramatic contrast and texture on the snow. A common mistake is shooting straight down a fall line; it creates a flat, two-dimensional image. Move laterally to introduce diagonal lines.
Expose for the Snow, Not the Sky: Your camera's meter will be fooled by all the white and underexpose, making your snow look grey. Use exposure compensation. Start at +1 to +1.7 stops. Check your histogram—you want the data to be weighted to the right (the "expose to the right" principle) without clipping the highlights on the brightest snow.
The Magic Hours are Different: In deep winter valleys, the sun is low all day. The "golden hour" can stretch to three hours around noon. But the absolute best light is often the blue hour just after sunset, when the sky turns a deep cobalt and the resort lights twinkle on. The snow acts as a giant reflector, filling in shadows magically.
Planning Your Photo-Focused Ski Day
You can't just wing it. Here’s how I structure a successful day.
- Scout the Night Before: Study the trail map like a battle plan. Identify potential vistas from lift lines and ridge trails. Check the official resort webcam and weather forecast (I trust Mountain-Forecast.com for alpine conditions).
- Morning Mission: If sunrise is the goal, know the first lift time and be in line. Pack your gear the night before. If not, use the morning for exploration—ride lifts with your camera safe in your bag, scouting angles with your eyes.
- Mid-Day Logistics: This is when light is harshest. It's the perfect time for indoor shots, lunch, or focusing on action shots in wooded areas where light is diffused. Let your spare batteries charge in the lodge.
- Afternoon Execution: Return to your scouted spots with the better afternoon light. Be set up at your sunset location at least 45 minutes early.
- Post-Shoot Care: When you go inside, do not open your camera bag immediately. Leave it zipped up in a cool entryway for an hour to let the gear acclimatize slowly. This prevents internal condensation.
Your Ski Photography Questions, Answered
Related Articles
Comments
Join the discussion